A WIRE AERIAL
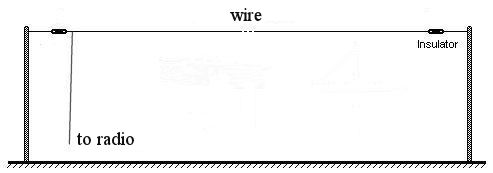
If you want to enjoy tuning around the medium or short wave bands on your vintage radio and listen to stations from afar, you will need an external aerial plugged into the back of your radio. A length of wire strung around the room will give you average results but, to pick up the far away DX stations, you will need an outside aerial. The diagram below shows an ideal arrangement, but any length of wire strung up outside the house will be pretty good.
For the best results, the wire should be as high as possible. Some radio manufacturers used to say that the wire should be no more than 50 feet long. This was because a longer aerial might overload the radio’s front end when receiving strong stations, which might cause problems. There are many shortwave radio stations transmitting from all over the world, and tuning around the short wave bands can be fascinating. You will find that the 13 – 16 – 19 – 21 – 25 and 31 metre bands are usually good during daylight hours. At night, the 41 – 49 – 60 – 75 and 90 metres bands come alive. Medium wave is also good during darkness with stations coming in from far way places.
DIPOLE AERIALS
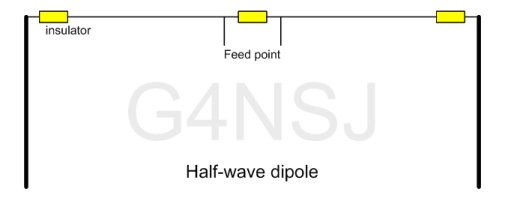
This is one of the simplest and most effective aerials. However, it can only be used for the band it is cut for. For example, a dipole for the 49 metre band (5900–6200 kHz) will be 78 feet overall. There’s a simple formula for working out the length of a half wave dipole. The centre of the 49 metre band is around 6 mHz. So, we divide 468 by 6. That gives us 78. The beauty of the formula is that the answer is in feet – 78 feet. This is the overall length of the dipole, from end to end. So, each element is 39 feet long. You can feed a dipole with coax or twin bell wire. The later option might be better suited to vintage valve radios. Take one wire to the aerial socket and the other to the earth socket on the back of the radio.
For transmitting, don’t worry too much about cutting the wires to the exact length. In fact, make them a foot or so longer. Once the dipole is up in the air, you can trim the wires by an inch or so at a time to bring the SWR down to one to one. Before checking the SWR and cutting the wires, remember that the aerial must be in its final position. Hauling the aerial up and down several times can be awkward, but it has to be done.
The centre insulator can be made out of any suitable material but try to keep it lightweight. Before soldering the connections, coil up about 6 feet of the coax and tape it up to form a choke. This coil should be about six inches diameter and as close to the feed point as possible. This will prevent the outer of the coax radiating.
Now you can haul the aerial up and do your SWR trimming. Remember to keep both the elements exactly the same length. If you snip two inches off one end, then you must do exactly the same to the other element. If you don’t, then the thing will lose its balance and you’ll never get the SWR right. By the way, do your SWR tests on low power so as not to blow up your radio.
FRAME AERIALS
For those interested in frame aerials for medium wave reception, I cover these, including construction details for a successful prototype, in the members’ area. See here for details of membership.
THE EARTH
It might be an idea to utilize the earth socket on the back of your radio if you want to do some serious long distance listening. Don’t use the mains earth as this could take interference from the house wiring into your radio and make matters worse. All you need is a wire taken from the earth socket on the rear of the radio to a metal stake in the ground in the garden. The metal stake should be at least four feet long and driven into damp soil. Do not hammer it into the water main or sewer pipe! To improve matters, you could link several earth stakes together with lengths of wire but, when using a domestic radio, it probably won’t make a great deal of difference.
If you’re interested in amateur radio, go HERE.


